Craftdot
Printable Halloween Banner: One Letter Per Page
A free HAPPY HALLOWEEN pennant banner, one letter per page with cut guides. Print, cut, string. Real timings and the spacing trick that matters.
No email or signup. Printing instructions are below.
On this page
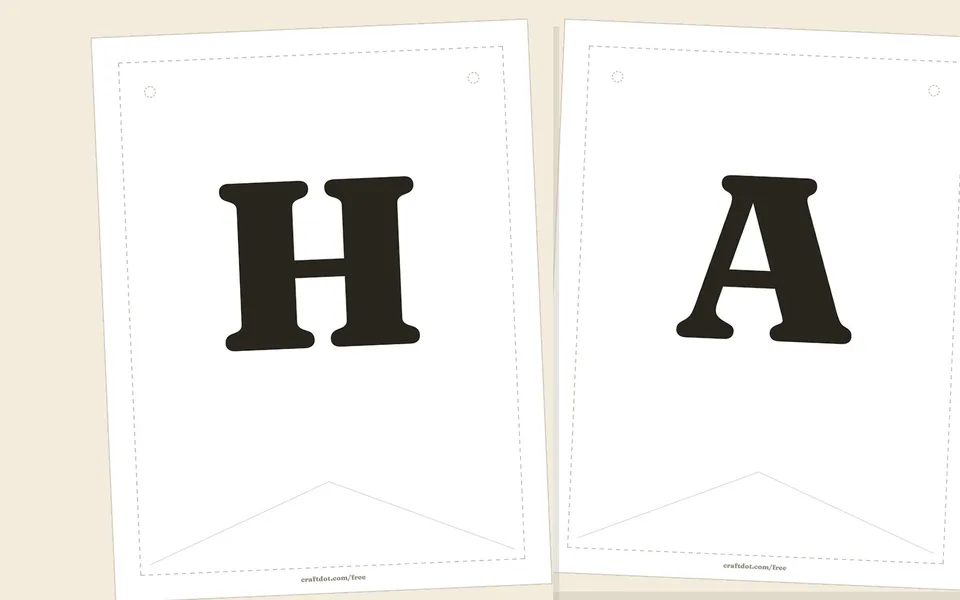
Fourteen letters, one blank flag for the space between the words, and a length of string.
We built this one to be forgiving. Each page holds a single pennant with a printed cut guide around it and a marked punch hole in each top corner, so there's no measuring and no eyeballing whether your Ls match. Cut on the line, punch on the circles, and every flag comes out the same size with its holes in the same place.
Download: HAPPY HALLOWEEN banner, free PDF, Letter + A4. No signup, no tricks.
Thirty pages, which sounds worse than it is. Pages 1 to 15 are US Letter and pages 16 to 30 are the same flags again on A4, so you print the fifteen that match your paper and ignore the rest.
What you need
- The banner PDF, printed on 15 sheets
- Cardstock if you have it, plain paper if you don't
- Scissors or a craft knife and mat
- A hole punch, a standard 6mm office punch is perfect
- 2.5 to 3m of twine, ribbon, or baker's string
Colour printing is nice but not required. On plain white paper the letters read fine, and there's a case for the stark black-on-white look above a fireplace.
The steps
- Print all fifteen of your pages first. Do the whole run before you cut anything. Printers pick this exact moment to run out of black, and finding out after you've cut six pennants is a small tragedy.
- Check the scale. Print one page and measure the pennant against the guide. If your printer is set to "fit to page" it will shrink everything by 3 or 4%, which is invisible on one flag and obvious across fifteen. Set it to 100% or "actual size".
- Cut on the guide lines. Stack two sheets at most. The pennant is a simple tapered shape, so the long angled cuts go quickly. Do those with a single confident scissor stroke rather than lots of small snips. Small snips leave a wavy edge.
- Punch on the two marks. Each pennant has a small dashed circle in each top corner. Centre the punch on the circle and it takes the mark away with it, so there's nothing to rub out afterwards. Do all thirty in one sitting rather than letter by letter as you string, because a stack and a rhythm is much faster.
- Thread the string. Go in through the front of the left hole and out through the front of the right. That over-under pattern is what stops the flags spinning to face the wall. Thread every letter before you adjust anything.
- Space it out. Slide the pennants so there's roughly a finger-width between each, then leave a bigger gap between HAPPY and HALLOWEEN. That single gap is what makes it read as two words instead of one long alphabet.
- Hang from the ends. Small nails, removable hooks, or a loop of tape at each end. Let it swag. Pulled tight across a wall it looks stiff, and a little curve reads much better.
Real time and difficulty
About 40 minutes start to finish, and most of that is cutting. Printing is 5 minutes, punching is 5, stringing and fussing is 10. Easy enough for a kid to do the punching and threading while an adult handles the scissors.
The honest gotcha: twine slips. If your pennants keep sliding into a clump at one end, put a tiny dot of tacky glue in each hole once the spacing is right, or tape the string to the back of each flag. A strip of washi tape on the back does it neatly and peels off in November.
Download: HAPPY HALLOWEEN banner, free PDF, Letter + A4. No signup, no tricks.
One variation
Cut the pennants down to just HALLOWEEN, which is nine letters, and use the six spare flags as backing. Glue each letter onto a slightly larger rectangle of orange or black paper so every flag gets a border. It ends up shorter and a bit more finished-looking, and it suits a doorway better than a mantel.
You can also skip the string entirely and tape the pennants directly to a window in a shallow arc. Works well on glass where twine has nothing to hang from.
Before you pack up
Store the banner strung, coiled loosely into a large envelope. Unthreading it means re-spacing next year, and re-spacing is the fiddly part.
Hang the bat garland below it on a second string and the mantel is finished in one evening. If glue comes into it anywhere, whether backing, hole reinforcement, or sticking flags to a window frame, our craft glue guide will save you a peeling letter.
Fifteen pages of letters is a long stretch of cutting with a small child underfoot. Our Halloween colouring pages for toddlers print on the same plain paper and keep them busy at the same table while you work.
Fifteen pages sounds like a lot. It is really one printing run and about half an hour with the scissors.
Common questions
Can I print the Halloween banner on plain paper in black and white?
Yes on both counts. Colour printing is nice but not required, and on plain white paper the letters read fine, with a case to be made for the stark black-on-white look above a fireplace. Cardstock is nice if you have it, but plain paper does the job.
How long does the Halloween banner take to make?
About 40 minutes start to finish, and most of that is cutting. Printing is 5 minutes, punching is 5, and stringing and fussing with the spacing is 10. It is easy enough for a kid to do the punching and threading while an adult handles the scissors.
How do I stop the pennants sliding into a clump on the string?
Once the spacing is right, put a tiny dot of tacky glue in each hole, or tape the string to the back of each flag. A strip of washi tape does it neatly and peels off in November. Threading in through the front of the left hole and out through the front of the right also stops the flags spinning to face the wall.