Craftdot
Washi Tape Gift Wrap on Plain Kraft Paper
Brown kraft paper plus three rolls of washi tape gives you wrapping that looks designed. Fifteen minutes per parcel, no ribbon, no bows, no glue.
On this page
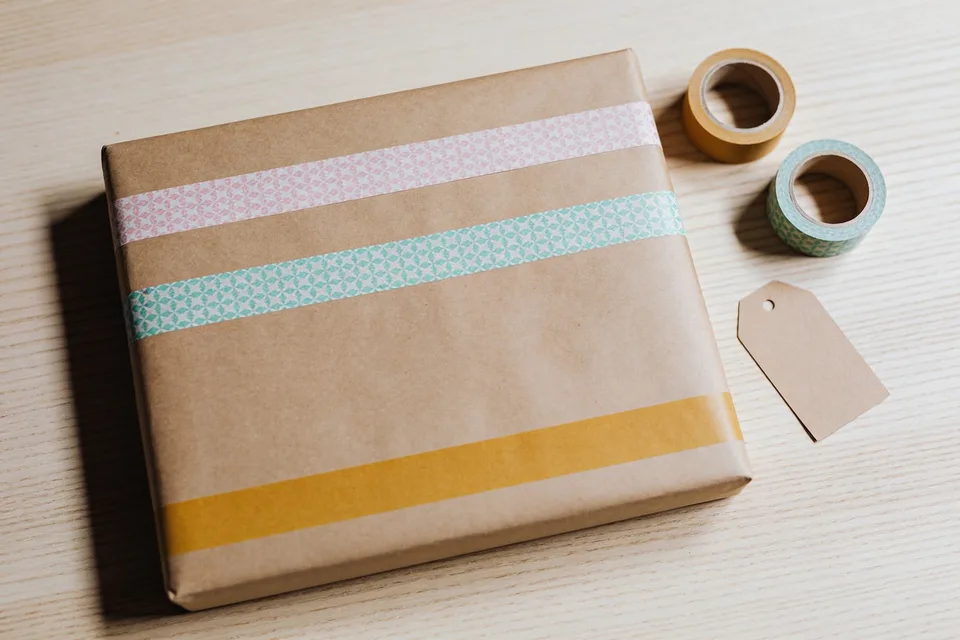
You will finish this holding a wrapped parcel in plain brown kraft paper, striped with washi tape, that looks like it came from a shop that charges for wrapping. Give the first one about fifteen minutes; after that they go much quicker. No ribbon, no bows, no glue, no curling scissors.
Kraft paper does most of the work here. It is cheap, it photographs well, and almost any pattern looks deliberate against it. The washi tape adds the colour, and it tears by hand, which is what keeps this quick.
What you need
- Brown kraft paper. A roll is cheapest; a paper grocery bag cut open works perfectly.
- Three rolls of washi tape. Two patterns and one plain, in colours that sit near each other.
- Scissors and clear tape for the wrapping itself.
- A plain paper tag, optional but worth it.
Three rolls is about right. Two tends to look thin, and by five it starts to look like a jumble sale.
Steps
-
Cut the kraft paper to size before you start taping anything. Wrap the box loosely, mark where the paper overlaps by about three centimetres, and trim. Long ends should reach a little over half the depth of the box on each side.
-
Wrap the parcel plainly first, with clear tape. Pull the paper taut across the top, tape the long seam down the middle of the underside, then fold the ends: sides in, top flap down, bottom flap up, tape. Keep every piece of clear tape on the underside where nobody looks. Wrap before you decorate, trust us. Washi tape stretched across a fold will not survive being folded again.
-
Decide which face is the front. Whichever face is cleanest and seam-free. Everything from here happens on that one face; the rest of the parcel stays bare.
-
Lay the first stripe down. Take your widest patterned tape, pull a length a little longer than the box, and lay it across the front face. Do not stretch it, just let it settle. Press it flat with a fingertip from the middle outward. Wrap the ends around the sides and tuck them under, or trim them flush at the corner with scissors.
-
Add the second stripe alongside it, with a gap. Leave a strip of bare kraft paper between the two, wider than either tape. The bare paper matters as much as the tape here. Stripes that touch just look like a mess.
-
Add the third stripe, the plain one, offset. Put it away from the pair, closer to one edge, so the front face reads as a group of two plus a single. Three evenly spaced stripes tend to look like shop packaging, whereas two together and one off on its own looks like someone chose it.
-
Tie or tape a tag to the front. A plain tag on kraft paper needs nothing more than a name in pen. Stick it down with a small square of the plain washi so it belongs to the same set.
Getting the tape straight
Washi tape is forgiving, which is why we reach for it over ribbon. It lifts and repositions two or three times before it stops sticking, so a crooked stripe is easy to put right without rewrapping anything.
Work with the roll rather than pre-cut lengths: anchor one end on the parcel, unroll along the face, then tear against the roll edge with your thumbnail. It tears straighter that way than it does with scissors, and much straighter than if you pull it free in mid-air.
If a stripe wanders, lift it slowly from one end at a shallow angle. Yanking it straight up will take a layer of kraft paper with it.
One variation
Skip the stripes and build a plaid instead. Run three stripes one way with wide gaps, then three across them at a right angle. Where they cross, the tape doubles in colour and the effect is worth it on a big flat box. It is a heavier look than stripes and takes a minute or so longer.
Before you go
Wrap the whole stack of gifts in one sitting while the rolls are out. The tape does not care how many parcels it crosses, and having the set match is a good part of the effect.
Match the parcel to the card with the score, don't cut card fold; a clean spine goes well with plain kraft. Print a sheet of five-minute gift tags to finish it, and there are more free sheets to print on the free printables page.
Common questions
How many rolls of washi tape do I need for gift wrap?
Three is about right: two patterns and one plain, in colours that sit near each other. Two rolls tends to look thin, and by five it starts to look like a jumble sale. The tape does not care how many parcels it crosses, so wrap the whole stack in one sitting while the rolls are out and the set will match.
Can I use a paper grocery bag instead of buying kraft paper?
Yes, a paper grocery bag cut open works perfectly, though a roll is cheapest if you wrap a lot. Cut the paper to size before you start taping anything: wrap the box loosely, mark where the paper overlaps by about three centimetres, and trim, with the long ends reaching a little over half the depth of the box on each side.
What do I do if a washi tape stripe goes on crooked?
Lift it and lay it again. Washi tape lifts and repositions two or three times before it stops sticking, which is why it beats ribbon here. Peel it slowly from one end at a shallow angle, because yanking it straight up takes a layer of kraft paper with it. Tearing lengths against the roll edge with your thumbnail also lays straighter stripes than cutting or pulling it free in mid-air.