Craftdot
Halloween Bat Garland: Free Template and 20 Minutes
Cut a flock of paper bats from our free template and string them into a garland. Honest timings, real gotchas, no signup for the PDF.
No email or signup. Printing instructions are below.
On this page
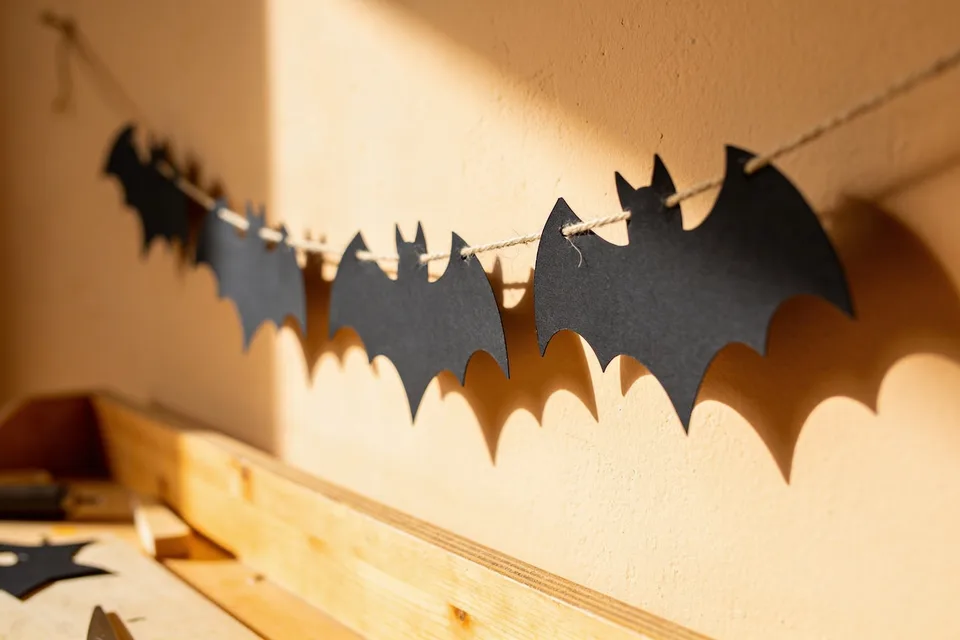
A paper bat garland is the cheapest Halloween win in the house. Black paper, twine and scissors, and nothing else.
Two things to watch for are bats that flip backward on the string, and paper too thin to hold a wing shape. Both are easy to dodge if you know before you start.
Download: Bat template, free PDF, Letter + A4. No signup, no tricks.
What you need
- The bat template, printed once per 3 bats
- Black cardstock or heavy paper, 160gsm or thicker is the sweet spot
- Sharp scissors, or a craft knife and a cutting mat
- Twine, baker's string, or black thread, about 2m for a mantel
- Small binder clips or clothespins (optional, but they make hanging painless)
Printer paper works. It just flutters, curls in a draft, and looks limp under a light. If cardstock isn't in the house, use two sheets glued back to back.
The steps
- Print the template. One page gives you three bat outlines in two sizes, two at about 17cm across the wings and one at about 15cm. Print as many copies as you need bats. Print on plain paper if you plan to trace, or straight onto the black cardstock if your printer will take it.
- Stack and cut. Two sheets of cardstock at a time, no more. Three feels efficient and gives you fuzzy wing tips. Cut the outer wing edge first, then the inner scallops, then the ears last, because the ears are the fragile bit and you want them cut while the paper is still supported.
- Score a fold down the spine. Run a bone folder or the back of a butter knife down the centre of each bat, then fold gently so the wings angle forward. This is the step people skip. It turns a flat sticker of a bat into something that catches light and reads as a shape from across the room.
- Mark your string spacing. Lay the twine out flat and mark every 12 to 15cm with a pencil dot. Even spacing is most of what makes a garland look deliberate rather than thrown up in a hurry.
- Attach the bats. Two options. Punch a small hole in each shoulder and thread the twine through both, which locks the bat in place and stops the flipping. Or run a line of glue along the spine fold and press the twine into it. If you're gluing, a tacky craft glue holds; a glue stick does not. We wrote up why in our honest guide to craft glue.
- Hang and adjust. Binder clips at each end let you slide the whole garland along a mantel until the drape looks right. Aim for a shallow curve, not a taut line.
Real time and difficulty
Twenty-five minutes for a 12-bat garland if you're cutting by hand and not fussing. Add ten if you're teaching a kid the scissors. Difficulty is genuinely low, because the only skill is patience on the wing scallops, and nobody will inspect them from two metres away.
The one honest warning: black cardstock shows every crease and fingerprint. Handle the bats by the wing edges and keep a scrap sheet under your work.
Download: Bat template, free PDF, Letter + A4. No signup, no tricks.
One variation
Cut the same bats from old book pages or brown kraft paper instead of black. Print the template on plain paper, cut one bat out, and use it as a tracing shape. The result reads more autumn-mantel than haunted-house, and it sits happily next to a paper leaf garland if you want the whole shelf to match.
You can also mix scales. Hang the larger bats low and the smaller one high, and the flock looks like it's flying up and out of the frame. If you want a wider size range than the template gives you, print one copy at 100% and a second at 70% in the print dialog; the smaller flock reads as bats further away.
Before you pack up
Store the garland by coiling it loosely around a paper towel tube. Folding it flat creases the wings and you'll be re-scoring every bat next October.
If you're building out the rest of the room, the printable Halloween banner uses the same string-and-twine logic and hangs from the same two binder clips. Between the two of them you have most of the front room covered.
If there is a much smaller helper at the table who can't manage scissors yet, our Halloween colouring pages for toddlers will give them something to do while you cut. Ten big simple pages, and nothing frightening on any of them.
Cut a couple of spare bats while you still have the cardstock out. They are handy when one tears, and they cost you nothing but the offcuts.
Common questions
How do I stop the paper bats flipping over on the string?
Punch a small hole in each shoulder of the bat and thread the twine through both holes, which locks the bat in place and stops the flipping. The other way is a line of glue along the spine fold with the twine pressed into it, and if you glue, use a tacky craft glue, because a glue stick does not hold. Bats flipping backward is one of the two things that genuinely go wrong with this garland, so it is worth picking one of these on purpose.
Can I make the garland from ordinary printer paper?
You can, but it flutters, curls in a draught, and looks limp under a light. Black cardstock or heavy paper, 160gsm or thicker, is the sweet spot, because it holds the wing shape once you score and fold the spine. If cardstock is not in the house, glue two sheets of printer paper back to back and cut the bats from that.
What size are the bats, and can I make bigger or smaller ones?
One template page gives you three bat outlines in two sizes, two at about 17cm across the wings and one at about 15cm. For a wider range, print one copy at 100% and a second at 70% in the print dialog, and the smaller flock reads as bats flying further away. Mixing scales on the string works too: hang the larger bats low and the smaller ones high, and the flock looks like it is flying up and out of the frame.