Craftdot
Paper Leaf Garland for a Fall Mantel
Cut simple paper leaves from our free template and string them into a warm fall garland. Honest timings, the curl trick, and no signup for the PDF.
No email or signup. Printing instructions are below.
On this page
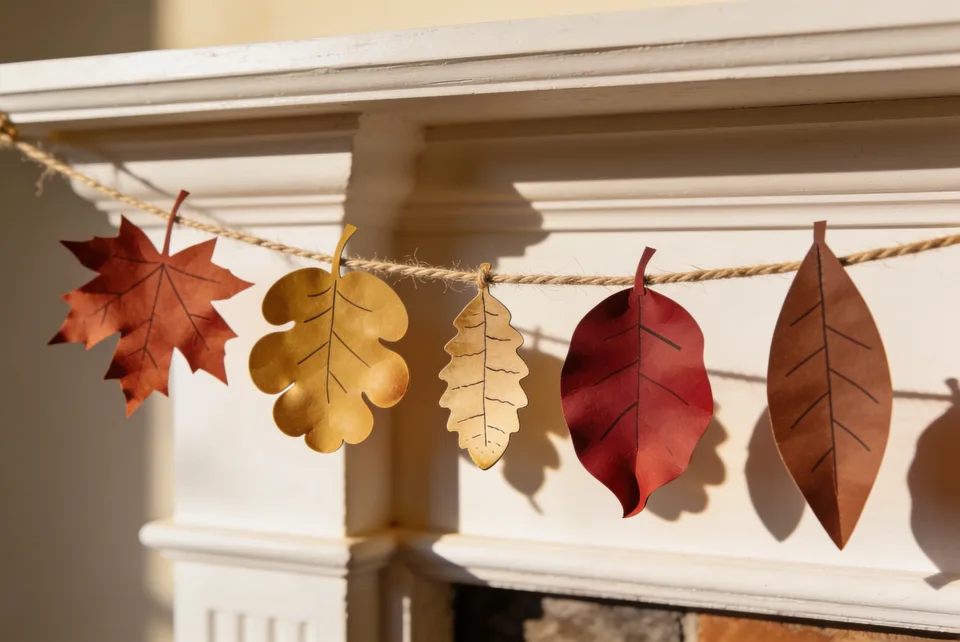
Real leaves crumble by day three. Paper ones sit on the mantel until you're sick of them, which is roughly mid-November.
This is the simplest garland we make. A page of leaf outlines, some warm-coloured paper, and a length of twine. The whole thing hinges on one detail most tutorials skip, and we'll get to it at step four.
Download: Leaf template, free PDF, Letter + A4. No signup, no tricks.
What you need
- The leaf template, one print per four leaves, or a single print if you're tracing
- Paper in three or four warm colours: rust, mustard, deep red, brown
- Scissors
- Twine or thin jute string, about 2m for a standard mantel
- A pencil, for tracing if you're cutting from coloured stock
Scrapbook cardstock is ideal. Grocery bags, old kraft envelopes, and the brown paper your parcels came in all work and cost nothing. Mixed paper weights actually help, because the garland looks better when the leaves aren't identical.
The steps
- Print the template. One page, four leaf shapes: a maple, a round-lobed oak, a birch, and a long veined one. They are all about the same size, roughly 11cm tall. If you're cutting from coloured paper, cut one of each shape from the printed page first and use those as tracing shapes.
- Trace and cut in batches. Trace six or eight at a time, then cut them all. Switching between tracing and cutting doubles how long this takes. Cut just inside your pencil line so no grey shows on the finished leaf.
- Draw the veins. A ballpoint pen or a fine marker, one centre line and four or five angled branches. Ten seconds a leaf. Without them the leaves read as blobs. With them you can tell what they are from across the room.
- Curl them. This is the step. Lay each leaf face-down and drag it over the edge of a table or a scissor blade, the way you'd curl ribbon, gently, one pass. Cupped leaves catch light and throw small shadows. Flat leaves look like they were laminated. If you'd rather fold than curl, a soft accordion down the centre works too; there's more on that shape in our rundown of the five paper folds every crafter uses.
- Space and attach. Mark the twine every 10 to 12cm. Leaves are smaller than most garland shapes, so tighter spacing looks right. Put a dab of tacky glue on the back of each stem and press the twine into it, then hold for five seconds.
- Alternate as you go. Colour, then shape, then which way the leaf points. Attach them in a repeating order, so rust facing left, gold facing right, brown facing left, and the eye reads it as deliberate.
- Hang with a swag. Both ends secured, a gentle dip in the middle. On a mantel, let a few leaves hang below the shelf edge rather than sitting perfectly on the line.
Real time and difficulty
Thirty to thirty-five minutes for a 16-leaf garland. Tracing and cutting is 20 of that, veins are 3, stringing is 8. It's genuinely beginner work, with no measuring, no symmetry to get wrong, and a leaf cut slightly off-shape still looks like a leaf.
The honest gotcha: glue-stick fails here. The stem contact patch is small and the leaf is heavy enough to peel off within a day. Tacky craft glue or a glue dot. Our craft glue guide covers which does what.
Download: Leaf template, free PDF, Letter + A4. No signup, no tricks.
One variation
Cut the leaves from plain white or cream paper and leave them uncoloured. Add veins in gold pen. It's a quieter, more modern garland, and it suits a room where rust and mustard would fight the furniture. It also carries on into a winter mantel instead of looking like leftover autumn.
Or punch a hole in each stem and thread the twine through instead of gluing. Slower, but the leaves spin in a draft, which is nice near a doorway.
Before you pack up
Store it coiled around a tube. Flattening the garland kills the curl you spent time on.
If you want more on the same shelf, the bat garland hangs on the same twine and shares the same spacing rules. Run the leaves along the front edge and the bats along the wall behind.
If there is a child at the table while you cut, the fall colouring pages are eleven free sheets in the same colours, with the simplest ones first.
Cut a few extra while the template is still out. Leaves are small and it is easy to end up short at the last stretch of twine.
Common questions
How long does a paper leaf garland take to make?
Thirty to thirty-five minutes for a sixteen-leaf garland. Tracing and cutting is about twenty minutes of that, drawing the veins is three, and stringing is eight. It is genuinely beginner work, with no measuring and no symmetry to get wrong, and a leaf cut slightly off-shape still looks like a leaf. For a standard mantel allow about two metres of twine, with a leaf glued every 10 to 12cm.
Can I attach the leaves with a glue stick?
No, and glue stick is the one supply that genuinely fails here. The contact patch on each stem is small, and the leaf is heavy enough to peel off within a day. Use tacky craft glue or a glue dot, press the twine into the dab on the back of the stem, and hold for five seconds. If you would rather not glue at all, punch a hole in each stem and thread the twine through instead. It is slower, but the leaves spin when the air moves, which is nice near a doorway.
Do I need special paper, or will scrap paper work?
Scrap paper works. Grocery bags, old kraft envelopes and the brown paper your parcels came in all cut well and cost nothing. Scrapbook cardstock is ideal if you have it, and mixed paper weights actually help, because the garland looks better when the leaves are not identical. Keep to three or four warm colours, so rust, mustard, deep red and brown.