Craftdot
The Beginner Paper Star: Six Folds and One Snip
Fold a sheet of paper into a wedge, make one straight cut, and open a perfect five-point star. Ten minutes, scissors only, no template.
On this page
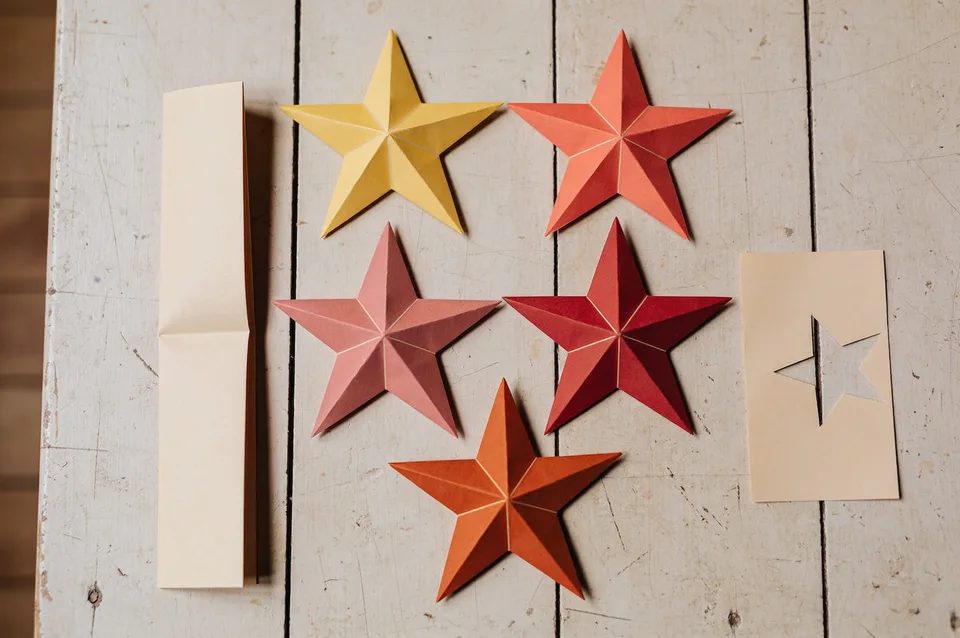
You will finish this holding a five-point star cut from one sheet of paper with one snip of the scissors. No template, no glue, no measuring. Ten minutes the first time, and much quicker once your hands know the folds.
This is the old fold-and-one-cut star. All the work happens in the folding, and the cut itself is one straight line.
What you need
- One sheet of paper, roughly A4 or Letter. Printer paper is ideal, because thin paper folds sharper.
- Scissors that can bite through eight layers. Kitchen scissors beat blunt craft ones.
- A hard flat surface. A table, not your lap.
That is genuinely all of it. Skip the ruler; you will not need a single measurement.
Steps
-
Fold the sheet in half, short edge to short edge. Turn it so the folded edge runs along the bottom and the two loose edges sit at the top. Press the crease down hard with your thumbnail. Every fold from here builds on this one, so make it clean.
-
Pinch the middle of the folded bottom edge. Bring the left end of that edge across to the right end, and squeeze just the bottom two centimetres. Open it back out. That pinch mark is your pivot. Every remaining fold rotates around that one point, and if a fold misses it, the star comes out lopsided.
-
Fold the left side over, pivoting on the pinch. You are dividing the bottom edge into five equal segments, so this fold swings the left side across by two of them, a little under half. Five is an awkward number: you cannot reach it by halving, so this one is an honest eyeball. Fold it, do not crease it yet.
-
Fold the right side over on top of it, by the same amount. You should be left with a narrow wedge, all layers meeting at the pinch. Fiddle both flaps until the wedge looks even and the outer edges of the two flaps sit level with each other, then crease everything hard.
-
Fold the wedge in half and check your work. Bring one long side of the wedge onto the other. If the edges land flush all the way up, your fifths were even and the star will be symmetrical. If they miss by more than a couple of millimetres, open the last two folds and nudge them. Fold before you cut, trust us. A wonky wedge cannot be rescued after the scissors.
-
Make one straight cut, at an angle. Start on the folded spine a third of the way up from the point, and cut in a straight line up to the outer edge. Keep the blade steady; it is a single pass, not a saw.
-
Open it out. Five points. The piece that falls away is the star. The frame you cut it from is the scrap.
Fat star or skinny star
The angle of that one cut is the only thing you can vary, and it makes a big difference. A shallow cut, closer to running parallel with the outer edge, gives you fat, friendly points. A steeper cut gives long, spiky, snowflake-ish points. Nobody gets their preferred angle first try, so cut one, open it, look, and refold a fresh sheet. Paper is cheap, and the second one goes much faster.
If your points come out blunt-tipped rather than sharp, the cut crossed the spine too close to the pivot. Move your starting point further up next time.
One variation
Cut a shallow V into the outer edge of the wedge before you make the main cut. When you open the star, every point ends in a notched, forked tip, so you get a proper decorative star for the sake of one extra snip.
Stack three stars in different sizes, offset the points, and glue at the centre for a layered version worth hanging.
Before you go
Cut six of these while the folds are still fresh in your hands, thread them on cotton, and you have a garland. The paper leaf garland for a fall mantel works the same way: fold one shape, cut a stack of them, and string them up.
If steps 3 and 4 fought you, it is worth spending ten minutes on the five paper folds every crafter uses first. And for a fold-only project with no scissors at all, the paper fortune teller is the one everyone already half-remembers.
Common questions
What paper works best for a folded paper star?
Ordinary printer paper, roughly A4 or Letter, because thin paper folds sharper. By the cutting step you are going through eight layers, so use scissors that can bite through that many. Kitchen scissors beat blunt craft ones, and you will not need a ruler, a template or a single measurement.
Why did my star come out lopsided?
A fold missed the pivot, or the fifths came out uneven. Every fold rotates around the pinch mark on the bottom edge, and the check comes at step five: fold the wedge in half, and if the edges land flush all the way up the star will be symmetrical. If they miss by more than a couple of millimetres, open the last two folds and nudge them before you cut, because a wonky wedge cannot be rescued after the scissors.
How do I get fatter or spikier points on the star?
The angle of the one cut decides it. A shallow cut, closer to running parallel with the outer edge, gives fat, friendly points, and a steeper cut gives long, spiky ones. If the tips come out blunt rather than sharp, the cut crossed the spine too close to the pivot, so start further up next time. Nobody gets their preferred angle first try, so cut one, open it, look, and refold a fresh sheet.