Craftdot
Halloween Treat Bag Toppers: 8 Free Printables Sized to Fit Your Bags
Eight Halloween bag toppers for 4in and 3in treat bags, with cut and fold lines marked and the size printed on each one. Free PDF, Letter and A4, no signup.
No email or signup. Printing instructions are below.
On this page
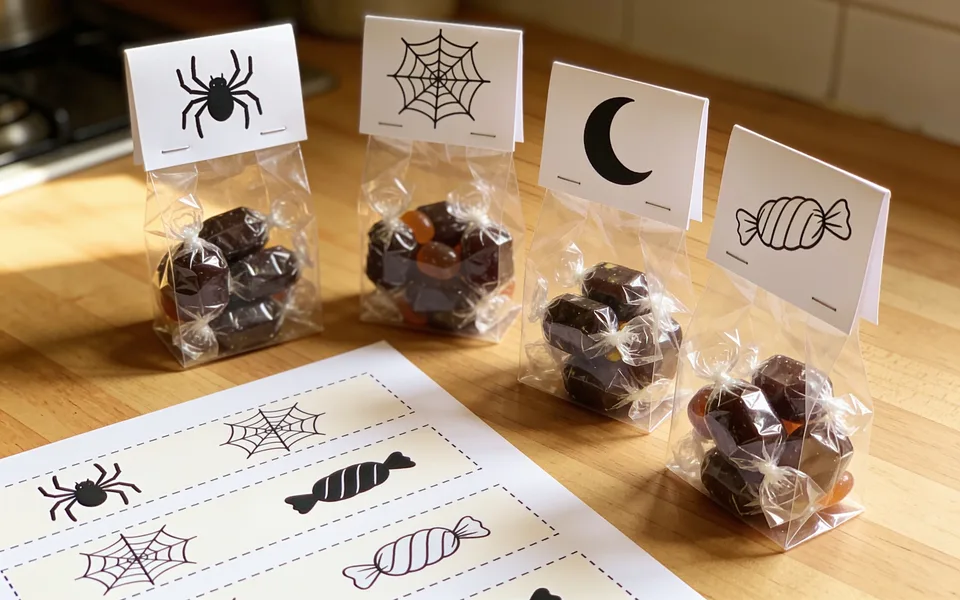
You will finish this with eight Halloween toppers for bags of sweets. A topper is the folded paper strip you staple over the top of a filled bag so it looks like something rather than a bag with a twist tie.
Four of them are cut to fit a 4 inch bag and four to fit a 3 inch one, and each one has its size printed on it so you know which is which after you have cut them out.
Download: Halloween treat bag toppers, free PDF, Letter + A4. No signup, no email, no tricks.
Here is the thing that goes wrong with printable toppers, and it is not the artwork. A topper only works if it is the same width as the bag. Neither of the two free toppers we read end to end on 28 August 2026 says what paper size it is drawn for, so if the sheet was drawn for the other size, or your printer quietly has Fit to Page switched on, it comes out a few millimetres narrow and no longer covers the bag. These sheets are drawn at a fixed size in millimetres, and they print at that same size on Letter and on A4. The width is printed on every topper so you can check it against your bags before you cut a single one.
What you need
- The PDF
- Plain printer paper works. Thin card, 160gsm or so, folds crisper and stands up better on the bag, so it is worth it if you have it, and not worth a trip out if you do not.
- Scissors
- A stapler. Sticky tape does the job too, on the inside where it does not show.
- The bags. Clear cello bags or ordinary sandwich bags both work.
What is in the file
Six pages: three topper sheets at US Letter, then the same three at A4. Print the three that match your paper, not all six.
Pages one and two, four toppers for a 4 inch (100mm) bag, two to a page. A jack-o'-lantern, a ghost, a bat and a cat, each with a caption: Happy Halloween, Trick or treat, Boo, and Happy Halloween again.
Page three, four toppers for a 3 inch (75mm) bag, four to a page. A spider, a spider's web, a moon and a wrapped sweet. No captions on these ones, because a 3 inch topper is small, and the artwork on its own reads better than artwork plus words squeezed under it.
Every topper is one strip with a dashed line round the outside to cut along and a lighter dashed line across the middle marked fold. The artwork sits on the bottom half, which is the front once it is folded over. The top half has the same drawing on it upside down, so that when you fold the strip the back of the topper is the right way up too. That is why the sheet looks odd flat and correct once it is folded.
The two small bracket marks near the bottom edge are where to staple. They are set in from the cut line so the staple goes through paper rather than through the very edge.
How to print it
- Print only the pages that match your paper. Letter is pages 1 to 3, A4 is pages 4 to 6.
- Set Actual Size, not Fit to Page. This is the one that matters here. Fit to Page shrinks the sheet by a few percent, and the whole point of these is that the width is right.
- Black and white is all there is in the file, so a black-and-white printer loses nothing.
- Cut one out and hold it against a bag before you print a stack. Ten seconds, and it tells you whether you want the 4 inch sheet or the 3 inch one. Bags labelled the same size do vary.
The busiest of the three sheets is under 1.5% ink coverage, so a run of these costs almost nothing, and they photocopy cleanly if you are making a lot for a class.
Putting one on a bag
- Fill the bag first, then flatten the top and press a crease in it with your fingers.
- Fold the topper along the dashed line. Fold it before you cut it out if you like, because a fold on a full sheet is easier to line up than a fold on a loose strip.
- Slide it over the top of the bag so the fold sits on the bag's own crease and the artwork faces front.
- Staple through both layers at the two marks. Two staples, one each side, is enough. Any more and the paper starts to tear when someone opens it.
If you are doing a lot of these, do them in stages. Fold all of them, then cut all of them, then staple all of them. It is much faster than finishing one at a time, and the folds come out more alike.
If they are going into a classroom
Two things worth knowing before you make thirty. Write what is in the bag somewhere, because there is white space on the back panel and a pen goes on it fine, and a topper that says Trick or treat tells nobody whether there are nuts in it.
And a stapled topper needs a grown-up's hands to get off if the paper is card, so for small children tape the topper shut on the inside instead and they can tear it open themselves.
More Halloween printables
If you are decorating as well as bagging up, the printable Halloween banner is one big letter per page, and the bat garland template is about twenty minutes of cutting for a wall full of shadows. Both are free and print on the same plain paper.
If the bags are for a party rather than a doorstep, a colouring page folded in beside the sweets gives the youngest guests something to do at the table. Our Halloween colouring pages for toddlers are ten big simple pages with nothing frightening on them.
Everything we make is on the free printables page, and none of it needs an email address.
Common questions
What size bags do these fit?
There are eight toppers: four sized for 4 inch wide treat bags and four for 3 inch. The size is printed on each topper, so you are not guessing after the sheet is cut apart.
How do I know which size I need?
Measure across the mouth of the bag while it is full rather than flat, because a full bag is wider. Then pick the sheet that matches. Neither of the two free toppers we read before making these states a width at all, which is how a topper ends up too narrow for the bag.
Do I need a special printer or paper?
No. Ordinary copy paper works, though card stock folds more crisply over the top of a bag. Cut and fold lines are marked on every topper.